This actually shocked me a bit... I used to think things are safer on base... Guess I was wrong.


 I've seen these fabric eggs sold in high end department stores. I've always thought they weere very cute, but honestly I can't afford to pay $20+ per egg. So I set out hunting for an easy tutorial on how I could make them myself. And thanks to Retro Mama we've got one!
 Cut out the pieces. Place pattern piece perpendicular to the fabric selvedge, trace the pattern with disappearing ink (see photo below) and cut four pieces from desired fabric prints. You may cut multiple pieces simultaneously from the same print by folding the fabric over one or more times, cutting up to 4 pieces at once. (Tip: If you're using a scrap and don't know which way the selvedge is, test which direction the fabric is stretchiest. The fabric is stretchier going perpendicular to the selvedge, and less stretchy going parallel with the selvedge; you want the stretch going from top to bottom of the egg, not side to side, so your egg doesn't get too "fat" when you stuff it. Hopefully that makes sense.)
  Place pieces together for sewing. Always keeping track of which end is "up", place 2 fabric pieces, right sides together, pinning if desired. Do the same with the remaining two pieces. Transfer the two dots from the pattern to the fabric pieces on top. If using two different fabrics, make sure both pairs have one of each print and that the same print is on the top of both sets.
 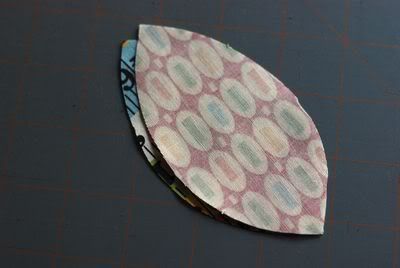 Sew a seam along the right side of one set of egg pieces, from top dot to bottom dot, backstitching at the top and bottom. Do the same with the second set of pieces.
  Put the two halves together. Turn one set of egg pieces right side out, and place inside the other set of egg pieces, so that right sides are together on the inside.
  Match the seams at the top and bottom and pin. (Note the purple ink marks on the lower righthand side in the photo below that indicate where I will leave a hole for stuffing)
  Sew the two halves together. Sew around the outside edge of the egg, leaving a 1" hole on one side for turning and stuffing, backstitching at the beginning and end of the seam. Trim the seam allowances, taking care not to snip into the stitches and leaving the seam allowances wide around the open hole. Turn the egg right side out through the hole and it will look something like this
 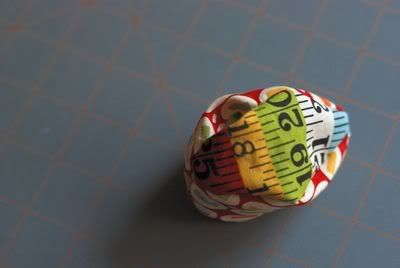 Stuff the egg firmly with poly-fill or other stuffing, and close the hole with small slip stitches/ladder stitches.
  Voila! You have a completed egg.
 Haystack Bird Nests
In honor of Memorial Day, the B&B and boutique inn owners on the Eastern Shore of Virginia have declared Thursday, May 14, 2009 “Virginia’s Eastern Shore Salutes Our Troops” day.
Twenty-one participating Eastern Shore B&Bs are offering a total of 50 rooms for FREE one-night stays to active military personnel and their special someone as a tribute to their military service. We want to recognize the sacrifice our men and women in uniform and their families make every day. In addition to a free night in a charming inn, many are offering extras such as dinner for two, free massage, and discounts for extended stays.
In response to the First Lady’s commitment to support military families, Eastern Shore B&Bs devised a way to give the troops what they need most – a quiet respite to spend time with a loved one in one of America’s special places. A secret hideaway tucked between the Chesapeake Bay and the Atlantic Ocean, this pristine peninsula offers serenity and small town hospitality.
To be eligible, military personnel need only provide proof of active service when they arrive at the B&B. You must be military personnel in active status to qualify.
 The Supply list:
 I added some hot glue to one of my circles in a pretty decorative fashion. Ha! Who am I kidding? I just squirted it around the frame!
 Okay. Now it's time to start hot gluing the eggs down. Look at the top right of the photo. This is where I started. I put a little glob of hot glue on the bottom of the green one and set it down on the cardboard with the fat end on the inside. Make sure you place the eggs horizontal on the board. Do not have them standing at attention or tilting upward. Next I placed the pink egg next to the green one and put one small dab of glue in between the two to connect them. You could probably see it if you click on the picture to enlarge it. Next I added the purple one and connected it to the pink and green one with more glue. To sum this up, you will have glue on the bottom of all the eggs to adhere it to the cardboard and anywhere it touches another egg, you'll need to put a little dab on it too. This will build a nice and sturdy wreath. As you can see with the first three eggs, the purple one nestles right in with the other two. As you work around the wreath, this is not the case with every egg. Look at the next two (yellow & blue). The blue can't quite nestle in between the yellow and pink. Not a problem. Just make sure that when you continue with your wreath, your outside eggs are facing out like a sunburst and your inside eggs are facing inward to a center point. Do not worry about the gaps where you can see the cardboard. We'll fix that later.
 When you get to the end, you will probably not have enough to finish out the wreath. This is PERFECT! You will need that space to put a bow there. By the way, I picked up these eggs (well actually 50 of them) at the local thrift shop for $2.50!
  Okay, the next step is to put the top layer on the wreath. I used 10 eggs...2 of each color. All I did was place them in a random fashion. You can look at the first picture for the example. You can place them over the places where you have the biggest gaps and then fill in or whatever you like. You will need to hot glue these down everywhere they touch another egg.
 Next, start with a little grass and using your pencil as a tool push some grass with the eraser into the gaps of your wreath. Start with the the gaps under the top layer of your eggs. Then you will need to put them between the outside rim of the bottom layer of eggs. In the space where the gap is, put a little bed of hot glue and let it cool a few second and then put some grass there to cover the cardboard.
 After you are done "grassing" your wreath, trim the fly-a-ways from the outside of your wreath to shape your wreath. Don't forget to trim the inside too!