Thursday, April 30, 2009

Pop-Tart Love

So I had been buying strawberry Pop-Tarts with out the frosting. We'll eat a pack every day, or two. I get one and Makayla gets the other. Well frankly I was getting kinds sick of the strawberry. So I went to the grocery store and was looking for frostless Brown Sugar Cinnamon, couldn't find them, so I wound up with the ones with frosting. So this morning I hand Makayla the Pop-Tart, now mind you, up until this point she's never seen frosting on a Pop-Tart before...

Makayla: What's this?

Mommy: It's a Pop-Tart.

Makayla: No, What's this? [points at frosting]

Mommy: It's frosting.
Makayla: Frosting?!?
Mommy: HaHa, yeah.

Makayla: Oh Mommy! Taaaaank you!!!

Mommy: HaHa it's not a big deal.

Makayla: You put frosting on Pop-Tart! Tank you Mommy!!! I love you mommy [hug & kiss]

::sigh::
I love how she's impressed by the little things... If only we could keep it this way forever.

Cloth Garland


I found this tutorial a while ago. It's from The Purl Bee. I had planned on making a garland for my daughter's 3rd birthday. Which is coincidentally today. I went out and bought a bunch of different red fabrics and then got home to only find out that my sewing machine's messed up... And there's no way I can sew this whole thing by hand! Oh well, I suppose it's one project that will have to wait till later. Hopfully I can get my sewing machine fixed by the 4th of July, I'd LOVE to make a patriodic one with stars instead of the crosses.


Materials

mpg6

This is enough to make at least a 40 foot garland!
  • Lots and lots of scraps in at least 10 different patterns. This would be a great use of fat quarters and it's also a fun and effective way to whittle away at your stash! (You may recognize some of the above patterns from my previous projects such as "Fabric Window Valentines", and the "Patchwork Easter Eggs".) You can get at least 6 feet of garland for every 1/4 yard (or fat quarter) of fabric!
  • 1 spool Gutermann Invisible thread
  • 1 set of Garland Templates which you can download here and here.
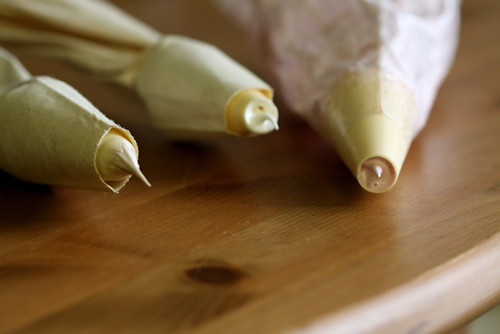
  • 1 heavy paper bag

Cut Fabrics

mpg8
Download and print the Garland Templates above. Transfer them to your paper bag and cut them out. I like to iron my paper bag first (but make sure not to use steam). It's helpful to use a heavy paper bag as opposed to just cutting out the original print-out because you'll be using the templates so much and you don't want them to wear down.

mpg9

mpg10
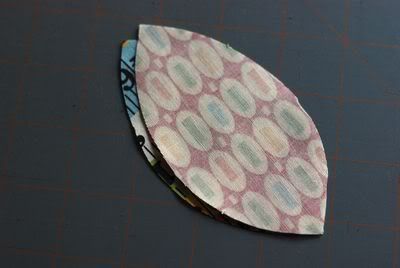
Press one of your garland fabrics and fold it in half, wrong sides together (so the right side is facing out.) Trace your templates onto the fabric. I did at least one tracing of each template on each fabric I had, and I also tried to do more of the smaller shapes than the bigger ones. The biggest shapes work best as an occasional accent.

mpg12

Cut out each shape. Since you are cutting on a doubled piece of fabric every shape cut will actually yield two pieces, both with their right sides facing. Keep these pieces together, you will treat them as one piece from now on. That way the garland won't have a right and a wrong side.

mpg14

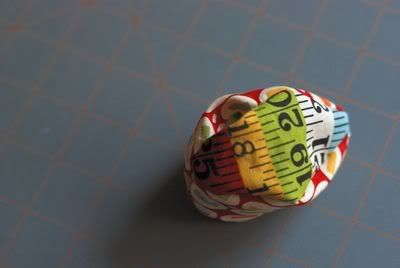
Cut the template shapes out of every fabric keeping like shapes together. Make sure to keep the front and back of each shape together as well.

This is the sort of project that's better to do over time as opposed to all in one day. I cut out the shapes in my spare time over a week or so (My hand got tired if I did too many!) and kept them in a box together until I was ready to sew.


Sew Garland

mpg15

Thread your machine and bobbin with the invisible thread.

Sew with a 1/4-inch seam allowance along the top edge of each set of pieces. Again, make sure that you're keeping the front and back of each piece together.

Pick another piece at random, place it directly after the piece you've just sewn, and continue sewing. Do not pick up the foot.

mpg17
There should be very little (if any) distance between the sewn pieces.

When sewing a flower piece, as shown above, sew your seam through the middle of the shape. For all other shapes sew with a 1/4-inch seam along the top.

Sewing the pieces together is the most fun part of this project. Try to vary the colors and shapes often. As you get going it will go faster and faster.

Just keep sewing in this manner until you reach your desired length. Keep the garland neat as you sew because it will get long quickly. You might want to wrap it around a piece or cardboard as it grows to keep track of it.

mpg18

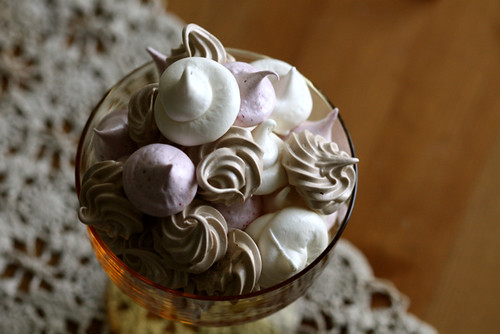
Here is a picture of the final garland. Notice how each piece has two right sides so it will look good from any angle.

Now all you have to do it hang it and enjoy. To get the garland to fit in your space properly don't be afraid to cut it... if necessary you can always sew it back together!

Wednesday, April 29, 2009

Framed Wall

I've seen walls like this in pictures and magazines. I'd KILL to be able to do this. I don't know why i'm afraid to try. I just have a feeling if I went out and bought a bunch of picture frames and painted them and then stuck them up on the wall, they'd just look frumpy. And I must not be the only one thinking this... Because even though I see this ALL THE TIME in magazines, I've never once come across someone who had done this in their house

MCMAP

So my husband started his MCMAP Green Belt course on Monday... And all I got to say is that I am sick and tired of picking tire bits off of my floor. I'm seriously considering making my husband strip down naked before he comes in the house.

Tupac

This made me laugh... Tupac's BACK!!!

Tupac Resurrected (MySpace Exclusive)


But no seriously, I know I'm going to sound like a total conspiracy thereat... But I honestly don't think Tupac's dead. HaHa

Monday, April 27, 2009

Obama is Responsible for the Swine Flu

President George W. Bush was unjustly blamed for Hurricane Katrina. According to liberal logic, he created bad weather and used hypnosis to convince residents to stay. Now the time has come to blame an act of God on another American president and give Barrack Hussein Obama hell for creating the swine flu. That's right, people died from the swine flu and Obama did nothing!

Obama lied, kids died!
Obama just doesn't care. He even put bacon on his cheeseburger. The Godless Left Wing Conspiracy will make it so that no child will ever be able to read Charlotte's Web again.

Monday, April 20, 2009

More Free Ice Cream!

Tuesday, April 21st is Free Cone Day at Ben & Jerry’s, and you know what that means...
free ice cream for you!

As a way to thank our customers for their support and to celebrate 31 years of scooping the chunkiest, funkiest ice cream, frozen yogurt and sorbet, Ben & Jerry’s scoop shops are happily giving it away!

Maybe it’s time for you to try a new flavor that you’ve been wonderingfree cone day 'thank you' cow about without committing your hard earned dollars or it’s time for you to enjoy an old favorite and savor in the deliciousness that is free ice cream? Hey, either way it’s time for you to come on in!

Around the world, Scoop Shops are opening their doors from noon to 8:00 pm, to serve up a free scoop of your favorite flavor. Please check with your local Scoop Shop for more info!

Grab a pal and come on down to have some good, ’scream fun on us!

Find a participating Scoop Shop near you!

Wednesday, April 15, 2009

Vegetarian Matzoh Ball Soup

In honor of the last day of Passover, I present Vegetarian Matzoh Ball Soup! In the words of Rachael Ray... Yum-O!

Ingredients:

1 1/2 cups matzoh meal
12 oz package firm silken tofu (like mori-nu)
1/4 cup plus 2 Tablespoons extra virgin olive oil
1/2 cup vegetable stock
3/4 teaspoon salt
3/4 teaspoon ground black pepper
1 carrot, peeled
handful fresh dill
fresh parsley for garnish
8 cups or so vegetable broth

Directions:
In a mixing bowl, combine the matzoh meal with salt and pepper, set aside.

Crumble the tofu into In a blender or food processor, add the vegetable broth and puree until smooth. Add the oil and blend again.

Mix the tofu mixture with the matzoh meal. Combine well, making sure that everything moist. Grate 1/2 the carrot into the mixture and combine until it's well distributed. Cover the bowl with saran wrap and refrigerate for at least an hour and up to overnight. You can't skip this step, it's important in making sure that the matzoh balls will not fall apart when boiled.

When you are ready to form the balls, fill a large stock pot with enough water to fit all the matzoh balls with minimal touching. Salt the water generously, cover and bring to a boil.

Have handy a cutting board to line up the formed matzoh balls, and cover it with parchment paper if you have it, to prevent sticking. Also have handy a wet rag to wipe your hands on to make for clean hands for forming matzoh balls.

Remove matzoh mixture from the fridge. Form into tightly packed, walnut sized balls. When all the balls are prepared, drop carefully into the boiling water, 1 or two at a time, with a spatula or slotted spoon. Take your time and be careful, not to plop one on top of the other. When all the balls are in the water, cover the pot and DO NOT LIFT LID FOR FORTY MINUTES! Sorry for the caps, just had to stress it. When the forty minutes are up you can remove the lid. The matzoh balls will have floated to the top and will drop back down when lid is lifted. This is fun to watch.

Now they are ready to serve, however, to make them even lighter, you can turn off the heat, cover the pot again, and let them sit in the water for another hour or so. This way they absorb more water and expand a bit more.

Prepare the broth by placing it in a seperate pot. Grate the other half of the carrot into the broth, along with a healthy handful or fresh dill, roughly chopped. Bring to a low boil, and when it's just heated you're ready to prepare the bowls.

With a slotted spoon, carefully remove matzoh balls and place 2 or 3 in a bowl. Ladle the broth over the matzoh balls, so that they're covered only about half way. You can garnish with some more fresh dill, or parsley. Serve to whoever you love.

If you are not serving the soup right away, you can refrigerate them over night, and boil them when ready, Some people even freeze leftovers, but I never have as there's never been leftovers.


FREE Busch Gardens/SeaWorld Tickets!!!

Anheuser-Busch is honored to salute the men and women of our armed forces and their families. Throughout 2009, members of the military and as many as three direct dependents may enter any one of Anheuser-Busch's SeaWorld, Busch Gardens or Sesame Place parks with a single-day complimentary admission.

FREE ADMISSION SUMMARY

Any active duty, activated or drilling reservist, or National Guardsman is entitled to free admission under the Here's to the Heroes program. He or she need only register, either by clicking here

and submitting his or her information or in the entrance plaza of participating parks, and show a Department of Defense photo ID. As many as three direct dependents of military personnel also are entitled to free admission. Dependents may take advantage of the offer without their service member, though an adult must accompany minor dependents, and dependent ages 10 and over must present valid dependent I.D.
Busch Gardens Williamsburg and SeaWorld San Antonio are seasonal operations that will remain closed until spring 2009. Military personnel interested in visiting those parks should check operating schedules. Click here for Busch Gardens Williamsburg. Click here for SeaWorld San Antonio. Click here for Sesame Place. The remaining parks, SeaWorld Orlando, Busch Gardens Tampa Bay and SeaWorld San Diego are open year round.

Valid for one complimentary single-day admission per person, per year, to one of the following Anheuser-Busch Adventure Parks: SeaWorld Orlando, San Diego, or San Antonio, Busch Gardens Tampa Bay or Williamsburg, Sesame Place, Water Country USA, Adventure Island. Not valid at Discovery Cove and Aquatica.

Tuesday, April 14, 2009

Free Ice Cream

Want free Ice Cream?

In honor of tax day, MaggieMoo's Ice Cream and Treatery is offering one free scoop per coustomer who visits their shop on April 14th.

Check their website for details!

Saturday, April 11, 2009

Hawaiian Sweet Bread


I absolutly LOVE Hawaiian sweet bread. Just a taste of sweetness, fluffy and light, that is the sweet bread that everyone loves. It is good just by its self, eaten in slices or even used for sandwiches. While still others swear it makes the best French toast. Lather with jelly and peanut butter or smeared with melted butter, which ever you prefer it is undeniably “Hawaiian Sweet Bread “is the favorite bread in the islands.

* 1/3 cup warm water (95-110 degrees)
* 2 pkg dry active yeast
*
1/3 cup evaporated milk
*
1 ¼ cups sugar, divided
*
4 cups flour
*
1/8 tsp ground nutmeg
*
1 tsp salt * ½ stick butter
*
3 eggs
* 1/2 tsp lemon extract
*
1/2 tsp vanilla extract

Directions:

Mix 1/3 cup warm water, yeast and 1/4 cup of sugar; let stand 20 minutes.


Combine 1 cups of the sugar, nutmeg and salt; mix.
Melt butter in a sauce pan, once melted combine 1/3 cup of evaporated milk with beaten eggs lemon and vanilla extract and nutmeg.

Mix well.
Add to flour.

Knead dough for 6-8 minutes by hand. (I make bread by hand. If you use a bread machine follow manufacturer’s instructions.)
Let it rise for one hour (proofing), until double in size.

Gently punch down and form into individual rolls. Appx. 12
Let rise for another hour.

Bake at 300 for appx. 45 minutes, or until light golden crust forms and baked through.

Egg Custard

Just finished my Easter dessert... Egg Custard... Total yummyness... Had to share.
Ingredients:
* 1/2 (15-ounce) package refrigerated pie crust
* 1 cup sugar
* 4 large eggs
* 1 (12-ounce) can evaporated milk
* 3/4 cup water
* 1/4 cup light rum
* 1/8 teaspoon salt
* 1/2 teaspoon ground nutmeg
* 1/4 teaspoon ground cinnamon
* Whipped cream, for garnish
* Powdered sugar, for garnish

Directions:
Preheat oven to 350 degrees F.

On a lightly floured surface, unroll pie crust. Roll pastry into a 12-inch circle. Press pie crust into a 9-inch deep dish pie plate, crimping edges, if desired. Lightly poke holes into the bottom of the dough once it's fitted firmly in the plate.

In a large bowl, beat sugar and eggs at medium speed with an electric mixer until well combined. Add evaporated milk, water, rum and salt. Beat at low speed until combined. Pour mixture into crust. Sprinkle top of pie with nutmeg and cinnamon. Place pie onto a rimmed baking sheet with a depth of 1/2-inch. Add hot water to baking sheet.

Bake for about 55 minutes, or until a wooden pick inserted near center comes out clean.

Cut into desired sizes and garnish with whipped cream and powdered sugar.

Friday, April 10, 2009

State’s funeral protest bill advances

The Associated Press
Posted : Friday Apr 10, 2009 20:27:56 EDT

CARSON CITY, Nev. — Despite strong objections from a few legislators, Nevada lawmakers have advanced a bill to restrict demonstrations near funerals of fallen soldiers.

AB1, endorsed by the Assembly Judiciary Committee on an 11-3 vote, would make it a misdemeanor to demonstrate at a funeral or memorial service with the intent to disrupt the service. Protesting at a ceremony such as a parade wouldn’t be prohibited.

A key reason for the proposed legislation is the picketing at some military funerals by Westboro Baptist Church members, who say the war in Iraq is a punishment for the nation’s tolerance of homosexuality.

“This same group protests outside of family planning clinics,” said Assemblyman William Horne, D-Las Vegas. “Why wouldn’t we exclude that as well?”

“I find it abhorrent that a white supremacy group can walk down the middle of a black neighborhood,” Horne said. “But I will defend their right to do that, despite the ugly history.”

Easter "Craft", Day 10: Hot Cross Buns

In many Christian countries Hot Cross Buns are traditionally eaten on Good Friday, the cross adorned tops representing Christ's crucifixion. According to cookery writer Elizabeth David, Protestant English monarchs saw the buns as a dangerous hold-over of Catholic belief in England, being baked from the dough used in making the communion wafer. Protestant England attempted to ban the sale of the buns by bakers but they were too popular, and instead Elizabeth I passed a law permitting bakeries to sell them, but only at Easter and Christmas. Nowadays they are generally only seen around Easter.

English folklore includes many superstitions surrounding hot cross buns. One of them says that buns baked and served on Good Friday will not spoil or become moldy during the subsequent year. Another encourages keeping such a bun for medicinal purposes. A piece of it given to someone who is ill is said to help them recover.

Sharing a hot cross bun with another is supposed to ensure friendship throughout the coming year, particularly if "Half for you and half for me, Between us two shall goodwill be" is said at the time. Because of the cross on the buns, some say they should be kissed before being eaten. If taken on a sea voyage, hot cross buns are said to protect against shipwreck. If hung in the kitchen, they are said to protect against fires and insure that all breads turn out perfectly. The hanging bun is replaced each year.

Hot Cross Buns
1 tablespoon dry yeast
1 1/2 cups warm milk
1/2 cup sugar
4 1/4 cup plain flour
2 teaspoons mixed spice
2 teaspoons cinnamon
1 cup dried fruit
1 egg
50 grams melted butter

Mix warm milk with yeast and 2 teaspoons of sugar.
Let sit for 5 minutes somewhere warm until frothy, indicating that the yeast is active.
In a large bowl add the sugar, flour, mixed spice, cinnamon and dried fruit.
Mix until combined.

Make a well in the center and add the melted butter, egg and yeast mixture.
Use a butter knife to mix then tip out onto a lightly floured bench and knead for 8 mins till smooth and elastic. (add more flour or water if the dough is too sticky or dry)

Place dough into an oiled bowl, cover with plastic. Allow to rise in a warm place for 45 min or until doubled in size

Take dough out and knead lightly then break into 12 segments of equal size.

Roll them into balls and arrange on a greased baking tray
Allow to rise in a warm place for another 40 mins.
During this time preheat the oven to about 200 degrees and make up a mixture for the

Crosses:
mix flour and water till it is a wet paste and pipe over the buns

Glaze mixture:
1/4 cup hot water 3 tablespoons of caster sugar
Bake for 10 mins then turn down oven to 180 degrees and cook for another 20-25 min or until springy to touch
Brush glaze over them as soon as they are out of the oven
Allow to cool and eat! YUM

Wednesday, April 8, 2009

Peeps Maker

You know Easter is right around the corner when you start seeing all the Peeps in the stores. This is one holiday treat I just don't get, especially the strange tradition of leaving the Peeps out uncovered for weeks to harden before consumption. And this isn't just a regional phenomenom - I've seen people do this on both coasts. If you're as Peeps obsessed as some folks I know, you may delight in the fact that you can make your own with this Peeps Marshmallow Maker. Comes with everything you need including fun molds to make your beloved Peeps so you don't have to wait once a year for them at stores. Now can somebody tell me what the appeal of Peeps is? I just don't get it...
Peeps Marshmallow Maker
Easter’s such fun due in large part to the
prevalence of Peeps! Did you know you
can now make these marshmallow treats
at home? It’s true! Make your own fresh
Peeps with this quirky kit. It com
es with
Peeps molds, marshmallow mix & bright
pink and yellow sugar! If you’re totally a
Peeps-a-holic we sell mix refills too. Yes!
$26 for machine / $8 for mixes

Tuesday, April 7, 2009

Easter Craft, Day 7: Meringues

Now that I've got my spiffy new KitchenAid Mixer, I love love love making meringues. This is such a great spring/Easter recipe, from Joy the Baker.

This recipe makes vanilla meringues with a dash of vanilla extract, chocolate meringues with unsweetened cocoa powder, and raspberry meringues with dehydrated raspberry powder (made from freeze dried and super ground raspberries). Feel free to play around with almond or coffee meringues using extracts too!

Easter Meringues

Spring Easter Meringues

  • 3 large egg whites
  • 3/4 cup sugar
  • 1/2 teaspoon pure vanilla extract
  • 1 teaspoon unsweetened cocoa powder
  • 1 1/2 teaspoons dehydrated raspberry powder
  1. Preheat oven to 175 degrees. Line 2 baking sheets with parchment paper; secure corners with masking tape. Fit three pastry bags with a small open-star tip or round tips (such as Ateco #22). If you don’t have three pastry bags you can use just one bag and wash and dry it between flavors. Set aside.
  2. Make meringues: Put egg whites and sugar in the heatproof bowl of an electric mixer. Set bowl over a pan of simmering water, and stir gently until sugar has dissolved and mixture is warm to the touch, 2 to 3 minutes.
  3. Transfer bowl to an electric mixer fitted with the whisk attachment. Mix on medium-high speed until stiff peaks form.
  4. Divide egg whites between three clean bowls. In one bowl mix in vanilla extract. In second bowl, mix in cocoa powder. In third bowl mix in raspberry powder. Stir all until well combined.
  5. Fill each bag with separate meringue flavors. Pipe small (3/4-inch-high) star shapes or round shapes (depending on your tip) onto prepared baking sheets.
  6. Bake cookies until crisp but not brown, about 1 hour 40 minutes. Turn the oven off and let the meringues cool in the oven. Transfer from pans to an airtight container for storage.
Easter Meringues

Monday, April 6, 2009

Media Coverage of KIA

So CNN posts "Ban lifted, media witness solemn return of fallen service member"The article goes on the explain how Staff Sergeant Phillip Myers, US Air Force, was killed in a roadside bombing in Afghanistan on Saturday. Since Obama had opted to lift the ban Bush Sr put in place nearly 20 years ago, prohibiting media coverage of the flag draped coffins bearing KIA service members returning from war... I guess it was saying Ssgt Myers widow chose to allow

CNN says "Her decision to do so was historical and allowed the public to see a side of the wars in Afghanistan and Iraq the country has not yet seen." Thats bull... Seriously, a side of the wars the country has not yet seen? Like we don't know what's going on over there or something? Why do we need to SEE the flag draped caskets returning? I think it's incredibly tacky and disrespectful. The KIS service member's return to Dover AFB is meant to be a private time for the families, and the whole act of media coverage was banned in the first place out of RESPECT for the servicemember and the greeving familys!

CNN goes on to say "Watching all of this were about 40 journalists allowed to cover the return of Myers' remains... The media were not allowed to cover the other soldier's transfer and were not given his name or the circumstances of his death, because the family had not granted permission."

Ok, look, there is no way in hell i'd give the media permission to exploite my husband's death (God forbid something happen to him)... And really, if I was that other service member's family, i'd be hella pissed that even though the media wern't taking pictures of my husband, i'd just be pissed that they were there in the
first place! I mean seriously? does it really take 40 people to sit there and take pics? NO!!! You allow one... ONE DOD photographer to photograph the transfer, and then allow access to those photographs for other media outlets.

Oh yeah, and I won't be reposting the pics from
Ssgt Myers transfer (tacky) so here's a few screen shots from HBO's Taking Chance. P.S. You want to learn more about the handling of the DOD's KIA, this is a great movie to watch.

Easter Craft, Day 6: Paper Mache

I love love love this SIMPLE Paper Mache tutorial from finecraftguild.com. I not only plan on making a bowl, but I plan on Paper Mache-ing a few small balloons, making eggs out of them to put int he bowl!

Paper Mache Ingredients for Easy Projects

1 newspaper,
1-2 cups of flour
1 cups of water

Also handy:
extra newspaper to protect
j-cloth
bowl with clean water

Easy Paper Mache Recipe Steps

  1. cut up your newspaper in long strips of even width
  2. put the flour in a metal bowl. Add the water while stirring till it becomes a paste
  3. slide the strips through the water and layer the wet strips over each other to create the desired shapes.
  4. to make a bowl, cover your favorite shaped kitchen bowl with gladwrap and use it as a mold.
  5. layer the wet strips over each other to create the desired shape.
  6. work in a circular motion
  7. when done, let the bowl dry in a warm dry location
  8. when dry, cut the top with a sharp knife into a smooth rim
  9. you may want to add a layer of paper covering the rim for a neat edge.
  10. let it dry again.

Enjoy the beautiful bowl you’ve created. Now you,re ready to sand your bowl and paint it with acrylics or gouache paint.

Tips for Successful Paper Mache Projects

  1. Start early, a lot earlier than you need the end result to be completed. If you start today, you can have several made, dried, sanded, painted and varnished even in time for Easter or Mother’s day gift giving.
  2. Have 1 extra newspaper to cover work area.
  3. Have some extra supplies: A j-cloth to soak up excess moisture on your bowl, and/or to handle an accident with the water bowl.
  4. I like having a little bowl of water to unmess my hands, but if you have a sink nearby, this is not necessary.

Materials for Painting

gesso
brush for gesso
smooth sand paper
earthen-brown-toned paint
gold paint
old cloth to rub it on

paper mache bowl

Painting Your Paper Mache Bowl

    Steps to create the effects of the bowl in the picture here:
  1. Add two coats of gesso
  2. Let it dry in between
  3. Then I sanded it down, showing bits of grey from the newspaper below.
  4. Then, use a tiny tat of yellow ocher and rubbed it on with a cloth.
  5. Let it dry.
  6. Last, brush on some gold paint for sophistication.

Voila. A very simply made, but interesting bowl for the coffee table.

Sunday, April 5, 2009

Even the PX isn't safe...

This actually shocked me a bit... I used to think things are safer on base... Guess I was wrong.

Easter Craft, Day 5:

I've seen these fabric eggs sold in high end department stores. I've always thought they weere very cute, but honestly I can't afford to pay $20+ per egg. So I set out hunting for an easy tutorial on how I could make them myself. And thanks to Retro Mama we've got one!

Fabric Easter Egg Tutorial
Materials:
10"w x 5"h Quilting cotton, linen or other non-stretchy woven fabric in one or more prints
Thread
Fiberfill, Nature-fill or other similar polyester or natural stuffing
Disappearing Ink Pen
Scissors
Pins
Hand sewing needle
Pattern (I recommend printing it on card stock for easy tracing)

Seam allowances are 1/4"

Cut out the pieces. Place pattern piece perpendicular to the fabric selvedge, trace the pattern with disappearing ink (see photo below) and cut four pieces from desired fabric prints. You may cut multiple pieces simultaneously from the same print by folding the fabric over one or more times, cutting up to 4 pieces at once. (Tip: If you're using a scrap and don't know which way the selvedge is, test which direction the fabric is stretchiest. The fabric is stretchier going perpendicular to the selvedge, and less stretchy going parallel with the selvedge; you want the stretch going from top to bottom of the egg, not side to side, so your egg doesn't get too "fat" when you stuff it. Hopefully that makes sense.) Place pieces together for sewing. Always keeping track of which end is "up", place 2 fabric pieces, right sides together, pinning if desired. Do the same with the remaining two pieces. Transfer the two dots from the pattern to the fabric pieces on top. If using two different fabrics, make sure both pairs have one of each print and that the same print is on the top of both sets. Sew a seam along the right side of one set of egg pieces, from top dot to bottom dot, backstitching at the top and bottom. Do the same with the second set of pieces. Put the two halves together. Turn one set of egg pieces right side out, and place inside the other set of egg pieces, so that right sides are together on the inside. Match the seams at the top and bottom and pin. (Note the purple ink marks on the lower righthand side in the photo below that indicate where I will leave a hole for stuffing) Sew the two halves together. Sew around the outside edge of the egg, leaving a 1" hole on one side for turning and stuffing, backstitching at the beginning and end of the seam. Trim the seam allowances, taking care not to snip into the stitches and leaving the seam allowances wide around the open hole. Turn the egg right side out through the hole and it will look something like this Stuff the egg firmly with poly-fill or other stuffing, and close the hole with small slip stitches/ladder stitches. Voila! You have a completed egg.

Saturday, April 4, 2009

Easter Craft, Day 4: Easter Nests

Haystack Bird Nests
  • 12 ounces white chocolate chips
  • 1 cup slivered almonds
  • 1 cup shredded coconut, sweetened
  • Food coloring, optional
Melt the white chocolate in a double boiler. When melted, add food coloring of your choice if you want colored nests as your finished product (I prefer just plain white - but maybe I'm boring). Stir in the almonds and coconut, coating well. Place a heaping tablespoon of the mixture onto a baking sheet that has been lined with wax paper, forming the mixture into the shape of a bird nest. Refrigerate until fully hardened. Fill the nests with "eggs" - jelly beans or foil-wrapped chocolate eggs. If you want the candy to stay in place inside the nest, use dabs of extra melted chocolate or cake icing as glue.

Friday, April 3, 2009

Virginia’s Eastern Shore Salutes Our Troops

Virginia’s Eastern Shore Salutes Our Troops
http://www.esvatourism.org/salute/

In honor of Memorial Day, the B&B and boutique inn owners on the Eastern Shore of Virginia have declared Thursday, May 14, 2009 “Virginia’s Eastern Shore Salutes Our Troops” day.

Twenty-one participating Eastern Shore B&Bs are offering a total of 50 rooms for FREE one-night stays to active military personnel and their special someone as a tribute to their military service. We want to recognize the sacrifice our men and women in uniform and their families make every day. In addition to a free night in a charming inn, many are offering extras such as dinner for two, free massage, and discounts for extended stays.

In response to the First Lady’s commitment to support military families, Eastern Shore B&Bs devised a way to give the troops what they need most – a quiet respite to spend time with a loved one in one of America’s special places. A secret hideaway tucked between the Chesapeake Bay and the Atlantic Ocean, this pristine peninsula offers serenity and small town hospitality.

To be eligible, military personnel need only provide proof of active service when they arrive at the B&B. You must be military personnel in active status to qualify.

How to Enter:
  1. Review the participating B&Bs.
  2. Select your first choice B&B by clicking on it in the first drop down menu.
  3. Select your second choice B&B by clicking on it in the second drop down menu.
  4. Complete the form including the contact number where we can reach you.
  5. Click Submit to enter. Please submit only one entry military person. Duplicate entries will be discarded.
  6. Submit your entry by April 16, 2009. We cannot accept entries after that date.
  7. Winners will be selected at random and notified by the B&B. Expect to receive notification by April 24, 2009.
  8. If we can’t connect with the winner after a few tries, we will draw another name to fill the slot.
  9. No purchase necessary.

Easter Craft, Day 3:

I love these easter egg wreaths... But you go to the stores and they're anywhere from $30-$50... Which I just can't bring myself to pay! So, I had to figure out a way to make one myself... For much cheaper!
The Supply list:
Cardboard, Plastic Easter Eggs (I used 42 regular sized)
Easter Grass
1 1/2 inch wide Ribbon
Wire or Pipe Cleaners for bow and hanger an the back.

The Tool List:

Hot Glue Gun
Scissors
A Pencil with it's eraser never used.

Let's get started!
We started with a base of cardboard. I just grabbed any box and cut out two circles. If your cardboard is super thick and sturdy, you can use one thickness if you wish. The outside of my circle is 12 inches and the inside measures 9 inches. This makes the wreath a little over 13 inches in diameter. If you need or want a larger wreath, then cut bigger circles....and you'll need more eggs.
I added some hot glue to one of my circles in a pretty decorative fashion. Ha! Who am I kidding? I just squirted it around the frame!
Okay. Now it's time to start hot gluing the eggs down. Look at the top right of the photo. This is where I started. I put a little glob of hot glue on the bottom of the green one and set it down on the cardboard with the fat end on the inside. Make sure you place the eggs horizontal on the board. Do not have them standing at attention or tilting upward. Next I placed the pink egg next to the green one and put one small dab of glue in between the two to connect them. You could probably see it if you click on the picture to enlarge it. Next I added the purple one and connected it to the pink and green one with more glue. To sum this up, you will have glue on the bottom of all the eggs to adhere it to the cardboard and anywhere it touches another egg, you'll need to put a little dab on it too. This will build a nice and sturdy wreath. As you can see with the first three eggs, the purple one nestles right in with the other two. As you work around the wreath, this is not the case with every egg. Look at the next two (yellow & blue). The blue can't quite nestle in between the yellow and pink. Not a problem. Just make sure that when you continue with your wreath, your outside eggs are facing out like a sunburst and your inside eggs are facing inward to a center point. Do not worry about the gaps where you can see the cardboard. We'll fix that later.
When you get to the end, you will probably not have enough to finish out the wreath. This is PERFECT! You will need that space to put a bow there. By the way, I picked up these eggs (well actually 50 of them) at the local thrift shop for $2.50! Okay, the next step is to put the top layer on the wreath. I used 10 eggs...2 of each color. All I did was place them in a random fashion. You can look at the first picture for the example. You can place them over the places where you have the biggest gaps and then fill in or whatever you like. You will need to hot glue these down everywhere they touch another egg.
Next, start with a little grass and using your pencil as a tool push some grass with the eraser into the gaps of your wreath. Start with the the gaps under the top layer of your eggs. Then you will need to put them between the outside rim of the bottom layer of eggs. In the space where the gap is, put a little bed of hot glue and let it cool a few second and then put some grass there to cover the cardboard.After you are done "grassing" your wreath, trim the fly-a-ways from the outside of your wreath to shape your wreath. Don't forget to trim the inside too!

Add the bow to your wreath in the space not covered by the eggs and add a pipe cleaner to the back to make a hanger for the wreath and you're done!