Thursday, December 25, 2008

Merry Christmas!

We had such a great day!
Woke up, opened our stockings and mommy made cinnamon rolls and baked brie with a strawberry glaze.

Then we opened the massive mound of Christmas presents! Mommy got some clothes, a PINK food processor, a photo printer, a PINK french press and a Coach bag. The hubby got a Blackberry charger, a "Smartcard" reader, , some clothes, shoes, and an elliptical. And I don't even know if I can begin to name everything the munchkin got... A few dolls and a ton of accessories, a Barbie, Barbie Bug, My Little Pony, Leap Frog Click-Start system with a couple games, a TON of PlayDough stuff, and even more clothes... Among a bunch of random little things.

Then Mommy had to get in the kitchen and cook, cook, cook... Looking back at it, I think I went a little crazy with dinner... I made: Mock-Meat Loaf, Yorkshire Pudding, Cranberry Sauce, Butternut Squash Risotto, Mini-Mincemeat Pie, Green beans, Mashpotatos and Mushroom gravy... Oh and plum pudding!

And if that wasn't enough work... We had to hurry and clean the house and pack pack pack because we're heading up to Cleveland for a week! UGH! I am just pooped, but I wanted to make sure I got on here to write a quick blog lettin everyone know I'll be gone till the 3rd... And just wanted to say that I hope everyone had a merry Christmas... And everyone has a happy New Year!

Christmas Day Menu!

Christmas Day Breakfast
Baked Brie w/ Strawberry Glaze
Cinnamon Rolls

Christmas Dinner
Yorkshire Pudding
Mashed Potatoes
Mushroom Gravy
Butternut Squash Risotto
Green Beans
Christmas pudding
Mini mincemeat pies
Pumpkin Pie

Unlike Thanksgiving I'm not making everything from scratch... Since we're leaving for vacation the day after Christmas I really wanted to keep the mess and work to a minimum. Plus, I just really didn't want to be in the kitchen all day long... So I went to my local British Market and got Yorkshire Pudding mix and Christmas Pudding

Wednesday, December 24, 2008

Walmart did it again...

* Dec.23rd, 7:47pm *
Ok... So 28 days ago I order my husband an elliptical from Walmart and have it shipped from "site to store" for Christmas. A week later I receive an email from Walmart letting me know that my order had come into my local store and I had till 6pm on December 24th to go and pick it up.


Well something like an elliptical would be a hard thing to hide for 3 weeks, so I decided to wait till today to go and pick it up. Well unfortunately for me, Walmart is soooo unorganized that they somehow managed to LOOSE my damn item. Now mind you this was my husband's big gift... AND I've already paid for it... And just BAM, they misplaced my elliptical! Since they don't even sell this thing in their stores, they pretty much gave me 2 options:
( 1 ) Cancel the order
or
( 2 ) Wait till it just "shows up"

WHAT!?! This is my husbands BIG gift! Ugh, and this is actually the 2nd year this has happened. Last year the weight machine I bought him got placed on back order and I ended up not receiving it till Mid-January! Ugh, I have the worst luck!


* Update: Dec.24th, 11:45am *
I can't even begin to explain how pissed off I am right now! So the girl I talked to back in the "site-to-store" section yesterday said she'd look into it some more and talk to a couple managers to see if they can locate the missing item and would give me a call today at 10am... Well she called at 10 this morning saying "I'm really sorry but we were unable to locate your item and will be issuing you a refund" WHAT?!? This is my husband's big Christmas present! And all you can do is issue me a refund?!? Ok, I really didn't want to take it out on that poor girl cuz she was really nice about the whole thing, and it really wasn't her fault. So I ask to speak to a manager. WOW! I mean I understand it's Christmas-Eve and you're probably stressed out but this woman was a total BITCH! I flat out told her I was trying to be incredibly nice considering HER store LOST my husband's Christmas present that I already paid for! And now it's too late to reorder it or even run around to different stores to find it! All I was wanting her to do was to call around the other local stores to find me one. But she coped a major attitude with me telling me, "Ma'am, I clearly don't know off the top of my head if another store will have this item". DUH YA MORON! I'm asking YOU to freakin call the other stores cuz this is clearly YOUR stores fault and not mine! Grrr... So I've talked to her, and 2 ladies at their HQ office and they are supposedly looking for one... We'll see if I get a call back.


* Update: Dec.24th, 5:00pm *
Oh man has it been a LONG day! Contacting HQ was useless they never called me back! I called 3 other Walmarts and they were all pretty bad. One manager even told me I shouldn't have waited till the last minute to buy one. No crap, ya think? In the end Walmart only sells the item online... I tried calling JC Penny's, Kmart, and Target who all carry the item online as well... But of course they don't sell it in the store. I did get a hold of Dick's Sporting Goods who told me they DO sell it in the store... But checked and they were all out. Crap! Apparently ellipticals are popular items this year! And wouldn't you know it, as soon as I gave up hope and finally told my husband about the Christmas present he wasn't going to get... The manager from the Walmart the elliptical was supposed to be shipped to called me back! And shockingly they had "found" an elliptical just an hour before they closed! So I ruched down there, battled the crowd of last minute shoppers and wound up getting an elliptical! Too bad now my husband knows what he's gettin for Xmas. )-:

25 Days of Christmas: Day 24

Charging station for cell phones, iPods, PDA's, PSP's, Etc.
I found this great tutorial on the Joann's Fabrics site.

SUPPLIES & TOOLS:
• 1/2 yd Cotton quilting fabric
• 1/2 yd Warm & Natural® batting
• 1/2 yd Decor Bond iron-on interfacing
• 1/4 yd 12-gauge clear vinyl
• 1 pkg Velcro®
• Basic sewing supplies
• Sewing machine
• Iron

DIRECTIONS:
1.
Cut two pieces of quilting fabric 15"Hx14"W. Measure and mark 8" up each side; also mark the center of the
top. Draw a line from the sides to the center top and cut.
2. Use the cut fabric pieces as a pattern to cut two pieces each of batting and interfacing.
3. Fuse iron-on interfacing to back of fabric and pin batting to front and back panels.
4. Cut a 6"x18" piece of vinyl for pocket.
5. Cut a 3"x18" fabric piece for vinyl pocket top. Fold in half lengthwise wrong sides together and press. Fold
edges into center and press to make four layers. Stitch to top of vinyl.
6. Pin pocket onto bottom of front, dividing evenly into three pockets and stitch allowing it to pleat at bottom.
7. For small pocket, cut two pieces of fabric 31⁄2"x51⁄2". Stitch all four sides, leaving an opening; turn & press.
Place pocket above vinyl pockets, fold in small tucks on sides forming a 3" square and stitch in place along
sides and bottom.
8. To create power strip holders, cut four pieces of fabric 3"x5". Fold long edges and stitch as in #5. Cut two 3"
strips of Velcro® and sew loop portions to two fabric strips and hook portions to two fabric strips. Pin one
hook and one loop strip to bottom of charging station front 4" in from one side, and another pair 4" in from
other side. Position Velcro® so the fabric strips wrap around a power strip and hook together to hold the
power strip in place.
9. For handle, cut two fabric pieces 3"x8", fold and stitch as in #7. Cut one 8" strip of Velcro®. Stitch hook portion
to one handle strip and loop portion to other strip. Pin handle, right sides down to top of front at point.
10. Pin back to front, right sides together and stitch, leaving a 4" opening for turning. Turn, press and stitch closed.

Tuesday, December 23, 2008

25 Days of Christmas: Day 23

I wish I could find a tutorial for this... I've seen these for a while now bug have yet to find a tutorial... Kinda a weird Christmas present I know... You gotta be on a REAL personal level with friends to give them this. HaHa. But in a strange way I think it's cute. I mean it makes since right? You put your babies diapers and whipes in a case? So why not your stuff too?

Christmas Winfow Candles

I was thinking about Christmas traditions the other night. The house I grew up in always had several candles in the window at Christmas time - electric ones with bright orange bulbs. Last month I read that the tradition of placing a Candle in the Window symbolizes the warmth and security of the family hearth and signals loyalty to family members and loved ones who are not present in the home. While doing some research for this post, I found this poem by Chaplain Larry Connelly.

A Candle in the Window

There’s a candle in the window
For our soldier off at war,
Standing constant vigil ’til
His foreign tour is o’er.

The sentinel stands faithfully
Through day and dark of night,
Reminding all who look its way,
To pray for Freedom’s fight.

For safety and for courage,
And for wisdom do we pray;
That God may grant him all these things
As his Comrade day by day.

Now stand, O Candle, bright and tall,
Alert us all, each one,
That the price of freedom is not cheap,
And its battle not yet done.

So light his way and burn for him,
And for his safe returning;
Our love will be the fuel that keeps
Our soldier’s candle burning.


So this holiday I ask you to consider placing a candle in your window for all our Soldiers, Airmen, Sailors and Marine's that are away from home this holiday season. While my husband is safe here at home, many husbands aren't.

Happy Holidays Everyone!

Monday, December 22, 2008

Baking Gingerbread

I love gingerbread cookies... But I've always found it a pain to have to go out and buy molasses JUST for this once a year project and then have a big jar of molasses sitting in my fridge which I never end up using. So I came up with this dirt easy Gingerbread recipe... WHich actually tastes like a mix between gingerbread and Teddy-Grams.
3/4 cup (1-1/2 sticks) butter, softened
1 cup packed brown sugar 1 pkg. (3.4 oz.)
1 pkg. JELL-O Butterscotch Instant Pudding

1 egg
2 cups flour
1 tsp. baking soda
1 Tbsp. ground ginger
1 Tbsp. ground cinnamon

Beat butter, egg, sugar, and dry pudding mix in large bowl with mixer until well blended. Mix remaining ingredients and gradually add to mixture. Refrigerate 1 hour or until firm. HEAT oven to 350°F. Roll out dough on lightly floured surface to 1/4-inch-thickness. Cut into gingerbread shapes and place, 2 inches apart, on greased baking sheets. BAKE 10-12 min. or until edges are lightly browned. Let stand on baking sheets 3 min. Remove to wire racks; cool completely. Decorate as desired.

Mmm... Pork Brains in Milk Gravy

Seriously?
Who buys this stuff???
And what in the world are you supposed to make with it?
Plus, check out that Cholestrol! 3500 for 2/3rds of a cup?!?

25 Days of Christmas: Day 22

I don't know why I didn't think of this before. Unfortunately I just bought my husband really nice club covers... BUT, my grandfather still uses old tube socks to cover his. HaHa, classy huh? This tutorial by CraftStylish is not only easy to follow but makes a GREAT last minute gifts for those Golfers in your life!


Supplies
* Men’s 100% wool long-sleeved sweater (the thicker the better!)
* The actual club you are crafting the cover for
* Straight pins
* Sharp scissors
* Sewing machine


Step by Step
1. Felt the sweater in your top-loading washer with the hottest water possible. Check the progress after the first wash, and run it through again if the fabric is not dense enough. Give it a tumble in a hot dryer to complete the process. If you want to skip the felting process, that is fine. Keep in mind a felted sweater will work best because it makes a thicker material to provide added cushioning around the club.

2. Pin the cuff of the sleeve so the club head just fits through the opening. Make sure there is a tight fit so you don't have a lot of extra bulk around the shaft of the club.

3. Mark the outline of the cover with pins prior to cutting. Pin along the seamline.


4. Make sure the length is on par with other covers that are in the golf bag. Keep the length the same as the other club covers in the bag.

5. Lay the club on top of the outline to see if you have a good shape. You are aiming for a smooth fit.

6. Begin cutting at the cuff edge, leaving a 3/8-inch seam allowance. Make sure you are cutting evenly on each side of the seam.

7. Sew along the seamline.

8. Slip in the club and make any shape adjustments.

Sunday, December 21, 2008

Can I get an Oorah?!?

30 Marine's, 250+ insurgents, and an 8 hour fire fight! "More than 50 enemy fighters were killed in the battle, and several more wounded, Marine officials said. A single Marine Corporal, serving as the unit’s designated marksman, killed 20 insurgents by himself, using only 20 shots to do it." And like the Marine Corps Times article says, this was "the kind of massive ambush and firefight that is the stuff of Marine legend." And better yet, not a single Marine was killed! Unfortunatly one Marine was injured, and prayers definatly go out to him and his family, aswell as those other 29 Marine's from 2nd Battalion, 7th Marines.

25 Days of Christmas: Day 21

I saw this one on The View, hand print canvas kit, but you know what, I've already got these in my house... And I didn't pay anywhere close to the $40 that Red Envelope was asking. My suggestion Joann's Fabrics sells 2 8x8 Canvases for $13 ($26 for 4) OR $2.15 a piece for 4x4 canvases ($8.60 for 4). PLUS another benefit, if you've got 5 family members, you won't have to buy 2 $40 kits from Red Envelope, You can easily just buy another canvas. PLUS, you can paint the canvases any color you;d like... Because I don't know about you, but these colors certainly wouldn't match my house.

The Night Before Christmas

My husband's ship the Iwo!
(He's not in the video)

Saturday, December 20, 2008

Shady Walmart?

So I've never had a problem like this at Walmart before... Or any store for that matter. So last week my husband goes to Walmart and buys 4 pairs of PJ's for our 2-1/2 year old. They were supposed to be on sale for $4.99 each, they were marked at $4.99 in the weekly flyer and and on the rack. After my husband came home, I checked the receipt and found that they rang up at $9.99 each. Needless to say I sent my husband back to get the price changed after work the next day. Unfortunately they said they couldn't give him the $4.99 price because "that sale ended yesterday" and even though he had a receipt to prove he had bought the items the day before they refused to refund him the difference. So he had to just return them all together.


Ok, so this is not the Walmart we usually go to. But it happened to be out where we went to dinner yesterday, so I decided to just run in and grab the items that we were planning to buy from the Walmart closer to our house. This is so frustrating, I only caught one thing at the time, and didn't really look at everything else till we got in the car... And at that point it was too late and not going back into the store to stand in the 45 minute costumer service line to return it.

Jumperoo marked $39.99, charged $59.96; Cookie Cutters marked $4.99, charged $6.00; Ballet Flat Shoes marked $8.99, charged $10.00; But this is the one that irritates me the most... Toddler Shoes marked $9.99, charged $10.00, at home I pealed off the sale sticker to see that she original price of the shoes were $6.99!

I caught the Jumperoo at the time and didn't end up buying it... But the rest I ended up paying for... Now yeah, that's only the difference of $5.03, which to me wasn't worth standing in the 45 minute customer service line... But the crappy thing for the consumers is I know I was NOT the only person that this happened to! You've got to figure there had to of been a good 200 people who went through those registers just in the hour I was in there... Now if each of those 200 people were wrongfully over charged $5, that's an extra $1000 for that Walmart... JUST IN A HOUR... Coming out to $24,000 a day, $168,000 a week and $672,000 just for the month of December!

25 Days of Christmas: Day 20

Ice Candles
Materials Needed:

Empty half-gallon cardboard milk or juice carton (rinsed and dried)
10" white candle
ice cubes
crayons
candle scent- optional
2 lb. wax

Prior to melting the wax you can prepare the mold. Place candle in the middle of the carton and fill with ice cubes. Make sure candle is centered while filling carton. Place carton in freezer until ready to use. Melt wax in coffee can placed in a pan with several inches of water over low to medium heat. Add bits of crayon/candle coloring and candle scent as desired. Stir wax while melting usingan old wooden spoon or wooden dowel. Do not leave melting wax unattended on stove. When the wax has melted, remove the mold from the freezer and slowly pour the melted wax into the mold. Make sure the coffee can is not too hot to handle prior to pouring the wax. Fill to the top of the mold and let sit for at least 15 minutes. The ice cubes will start to melt and you can drain water out of the candle by holding over the sink. Let candle sit for another 15 minutes and drain again. Repeat several more times, then carefully peel away the carton from the candle. Let the candle sit for several more hours in order to ensure all of the water has drained out. You can dust the outside with glitter for decoration. Place on a ironstone plate, decorate bottom of candle with greenery, light & enjoy.

Friday, December 19, 2008

Santa Bootcamp

25 Days of Christmas: Day 19

Here's another great gift idea for those with small children, a VERY simple sew diaper case from Sleeping Baby. Trust me, this is defiantly one of those things that even a beginner sewer can whip up in the matter of a hour or so!
The directions are actually too detailed for me to cut and paste here, so you'll have to check out Sleeping Baby's site!

FedEx

FedEx is nuts!

So I baked a bunch of cookies yesterday and drop them off at FedEx at 4pm to be sent priority overnight from here (Hampton Roads, VA) to my parents in Orange County, CA... 2800 miles, and 9 states away! At 9am... Only 17 hours later... What did my mom receive? The box! In tact!

I seriously love FedEx! This is the 2nd box I've sent priority overnight which is totally worth every penny it costs!
Plus, unlike FedEx they don't throw the boxes at your door and run leaving broken goods.

Thursday, December 18, 2008

Santa's Bootprints

Like with the Santa Thank You Cards, my family had another tradition of leaving Santa bootprints leading from the chimney to either the tree or the table that we left the cookies on. I created this template to make it a little easier.


Here's the deal... You print this template out, carefully cut along the black line and discard the grey striped area. You basically just use this as a stencil, staggering the prints on the ground, sprinkling with baking powder or carpet fresh maybe mixed with a little glitter (FYI, don't use baby powder, it's too fine and impossible to clean up)... And voilà! Santa tracks!

25 Days of Christmas: Day 18

I've always found it kinda hard to find things to make for babies... Well here's a great gift that EVERY baby can use. BIBS! I found this great tutorial on Sew Funky!

Materials Required:
33cm x 28cm Printed Cotton
33cm x 28cm Toweling
33cm x 28cm Flannel or Similar
Cotton Velcro

Instructions:
1. Make a pattern or use one from the internet - chickpea sewing studio has a good one. Mine is longer than hers, and you can adjust the pattern to suit what you want. I based mine on a bib I was given when my girls were small. (Thanks Anita!)

2. Lay your pattern out on your chosen cotton fabric, pin & cut out.


3. Lay your pattern out on your chosen toweling fabric, pin & cut out.

4. Lay your pattern out on your chosen backing fabric, pin & cut out. (only took a pic of cutting)
5. Make heaps at a time - I made 10 bibs this time! You can make it like a factory line.
6. At this point you could zig-zag the edges, but as the edges get clipped later there isn't much need.

7. Layer the fabric like this; First the toweling
then the printed cotton (face up)
last, place the backing fabric on the top (face down)
8. Pin together and sew, leaving a gap on the side so you can pull the bib right way out!

9. Carefully, trim away the edges leaving a small edge. This makes the bib sit nicely when you pull it through!
10. Pull the bib through the gap you left at stage 8. Use a chopstick or something similar to get the neck to look right.
11. Iron the bib.
12. Top-stitch the edges so that the bib sits nicely. You can use a fancy stitch if you like.
13. Sew Velcro on so that neck can open and shut easily.
14. You have a great little bib!!

Christmas Gift Tags

I don't know about you, but I really hate paying $5 for a sheet of sticky gift tags... I Usually just make my own with my die-cut machine but have just been so busy this year I just made these printable ones. This is an 8X10 sheet, just click here, enlarge the icon, right click and save on your computer. This is a JPEG file and should open on any graphic program. Even "paint shop" that comes with every computer.

Wednesday, December 17, 2008

Santa Clause Thank You Cards

Growing up we always had a tradition of leaving notes to Santa next to the Christmas cookies and in return Santa would leave my sister and I a thank you card. I thought I'd share them on here if anyone was interested... Just click on the appropriate link below, enlarge and right click the image. Once saved to your computer you can open the file with any photo editing program and easily print it from there.


Card for a GIRL
Card for a BOY
Card for multiple CHILDREN

Too Cute!

On my gawd! how freakin cute is this little girl!!!

25 Days of Christmas: Day 17

Elf Boot Stocking
By: Family Fun

CRAFT MATERIALS:
Scissors
2 pieces of light green fleece, each 24 by 20 inches
3 pieces of dark green felt, each 24 by 20 inches
Long sewing pins
Large-eye sewing needle
Dark green embroidery floss
Red jingle bells, 4 medium and 1 large
Clear tape
9 inches of red twist cord
Fiberfill
Time needed: About 2 to 3 Hours

1. The Basic Stocking: Click here to download the elf boot stocking pattern.

2. Cut 1 boot shape from each piece of the light green fleece

3. Cut a decorative shape from 1 piece of the dark green felt for the front of the stocking and 1 stocking shape from each of the remaining 2 pieces of the felt.

4. Place a light green boot on top of a dark green boot, pin the decorative shape on top, and use the floss to whipstitch (see page 131) around the inner edge of decorative shape through both boots.

5. Pin together all 4 boots with the dark green boots on the inside.

6. Using the floss, whipstitch around the edges, sewing the boots together. Leave the top edges unsewn.

7. At the top, sew together the front 2 edges, then the back 2.

8. Fold down the top to make a cuff.

9. The trimmings: Use the floss to sew the medium red bells to the decorative shape and the large red bell to the toe tip.

10. Tape the ends of the cord to keep them from fraying, then sew the cord to the stocking for hanging.

11. Stuff the curly toe of the boot with fiberfill to keep it from flopping over when the stocking is empty.

Tips: A Stitch for All StockingsThread your needle with a length of floss and knot one end. Begin sewing by pushing the needle up through the underside of the fabric and then out the top. Loop the needle back under the fabric and repeat the stitch.

Tuesday, December 16, 2008

Top 30 Military Friendly Colleges

Military Advanced Education has released the top 30 military-friendly colleges in the United States based upon information gathered from 100 schools that applied for the distinction. The top colleges and universities were selected based upon criteria such as number of military students, availability of financial aid, number of military contracts and more.

A significant number of
online schools showed up among the winners, along with educational institutions that offer both accredited online degree programs and traditional on-campus classes.

Those selected are institutions that open their arms to active duty and non-active duty military. Many of these schools are either located in close proximity to military bases, are distance-learning schools, or offer courses directly on military installations. Others provide special scholarships and financial aid to the troops and their wives. But almost all bend over backwards to offer additional support and consideration to members of the military and their families.


The top 30 military-friendly colleges are as follows:
American Military University
Central Texas College
Coastline Community College
Colorado Technical University
Excelsior College
Saint Leo College
Thomas Edison State College
University of Maryland
The University of Oklahoma
Webster University
American InterContinental University Online
Bellevue University
Capella University
Central Michigan University
Colorado State University-Pueblo
Columbia Southern University
Duquesne University School of Leadership
Florida Community College
Grantham University
Hawaii Pacific University
Jones International University
Kansas State University
National University
Olympic College
Southern Illinois University Carbondale
Strayer University
TUI University
University of Mary
The University of North Carolina at Pembroke
Western Governors University

25 Days of Christmas: Day 16

Kid-sized chef apron
From:
Supafine
Here’s an idea: a chef’s apron for your toddler. Lord knows he won’t wear a bib anymore, am I right? Here’s a quick way to make one. It takes two pieces of about 12”x20” fabric, plus two pieces that are 7.5”x20”. So, let’s see, you can make it out of about a little more than a yard of 44”-wide fabric. I think.

Here is the cutting layout, although it doesn’t include the second apron piece laid out. These measurements are for an apron that fit my Owen, who wears a 2T. The same concept embiggened would fit an older child, or even yourself. Just measure yourself where an apron would be, and remember to halve the measurements for cutting on the fold, and to add enough for a 1/2” seam allowance.

Once your pieces are cut, assemble the apron strings. I usually assemble strings and straps thiswise: fold them in half lengthwise and press, then unfold. Fold from the edge to the center fold line lengthwise for top and bottom. Press. Then fold in half, enclosing the raw edges, and sew along the open side. Turn one short edge under twice and stitch it down.
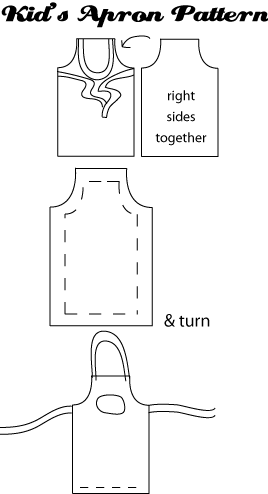
With the right side of one of the unfolded apron pieces facing up, lay the apron strings in the appropriate places, raw edges matching and strings toward the center. Pin them in place as shown below. Lay the other apron piece on top, right sides facing. Starting about 3” from the center bottom, stitch all the way around the edge, using a 1/2” seam, and going over the straps. Stop a few inches from where you started to leave room to turn (be sure to backstitch).
Be sure to clip the seam allowance nearly to the stitching line on the curves, to make them lie flat, and trim corners at a 45-degree angle to eliminate bulk.

Turn it inside out. Press.

Suckers will hand-slipstitch the opening closed; lazy people like me will edgestitch the whole thing. Then voila! Apron!